Brian Tanaka's Blog
[ Home | briantanaka.com | RSS 2.0 | 2010 Archive | 2009 Archive | 2008 Archive ]
Fri, 27 Aug 2010
posted at: 11:11 | path: /misc | permanent link to this entry
Tue, 06 Apr 2010
posted at: 11:11 | path: /misc | permanent link to this entry
Tue, 09 Mar 2010
This article is a step-by-step guide to enabling Japanese input (hiragana, katakana, and kanji) in Ubuntu.
If you've ever seen the great way Mac OS X's built-in international input system magically transforms typed romaji to kana on-the-fly and wished you could do the same thing in Linux, you're in luck, thanks to a pair of great utilities: IBus and Anthy.
Once you install and configure IBus and Anthy, you can easily flip back and forth between English and Japanese input. It's great. Let's get started.
The current version of this article:
- Applies to Ubuntu, Karmic Koala.
- Does not cover installing fonts.
Step one: Avoid SCIM -- You may find, as you Google around, many references to SCIM. Ignore them. SCIM seems to have some issues in Karmic. For me, SCIM would run, but it would not actually... you know... work.
Step two: Install IBus and Anthy -- If you're in the shell, use the command 'sudo apt-get install ibus ibus-anthy', or use Synaptic to install ibus and ibus-anthy. (Installing both ibus and ibus-anthy is probably overkill since installing ibus-anthy will probably install ibus as well. However, if you explicitly install both, as I did, it will do no harm.)
Step three: Set your environment variables -- Add the following lines to your ~/.bashrc (or equiv):
# ibus
export GTK_IM_MODULE=ibus
export XMODIFIERS=@im=ibus
export QT_IM_MODULE=ibus
Step four: Activate your environment variables -- Log out and log back in, or simply source your ~/.bashrc (or equiv).
Step five: Setup IBus -- At a shell prompt, type: ibus-setup
Step six: Set the input method to Anthy -- In the Input Method tab, use the "Select an input method" pop up menu to select Japanese Anthy. Now, click Add. Your Input Method list should look like so:
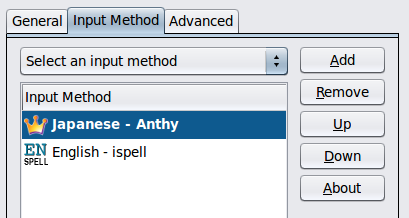
Note that I've moved Anthy to the top of the list. You'll want to do the same.
Step seven: Trigger IBus -- Launch an app you'd like to type into and use the default trigger (ctrl-space) to start IBus. (Or use whatever custom trigger you defined during set up.) Notice that the little IBus floating generic xanax window thingy appears somewhere on your screen. The screenshot below shows the floating window with the Anthy kana/kanji selector activated.

Step eight: Try it out! -- Start typing romaji. Note how IBus-Anthy magically transforms your romaji into hirigana (or whatever you have selected in the kana/kanji selector). Pretty cool, eh?
Step nine: Turn it off -- The trigger (ctrl-space) toggles IBus on and off.
Step ten: Make IBus start when you log in -- There are several ways of accomplishing this, but one (slightly kludgey way) is to simply add 'ibus-daemon &' (without the quotes, obviously) to your ~/.bashrc (or equiv). You'll want to test this before logging out by sourcing your .bashrc, like so: source ~/.bashrc -- If you get a prompt back after running that source command, and if IBus is running, you're good! If you prefer to start IBus manually, simply type ibus-daemon& from a shell prompt whenever you want it running.
The next natural step is to make the Japanese fonts look good. I'm out of time for now, but once I tackle the Japanese fonts fixin', I'll post my findings here.
If you have questions or comments, drop me an email message. Thanks.
posted at: 11:11 | path: /linux | permanent link to this entry
Thu, 09 Apr 2009
Hey! Look at that... I changed the layout of my entire site, including this blog. Enjoy!
posted at: 11:11 | path: /misc | permanent link to this entry
Sat, 25 Oct 2008
If you're having trouble with group permissions on git objects in a shared environment, read on.
Recently, I needed to set up a git repository to which a number of people would need to push. I used Don Marti's excellent article on LinuxWorld, Getting a static web site organized with git as a guide.
Everything went according to plan. I created a new user and group, added the user accounts of all the collaborators to the newly created group, made the home directory (where the repository would live) setgid, git init, created a subdirectory for the working files that would be served by Apache, and installed the post-update hook that keeps the working files checked out. (I'm breezing through these steps. You can get more detail by reading Don's article.)
At first everything worked correctly, but once multiple people had git pushed to the repository, we began running into permissions issues despite the setgid. They manifested roughly like so:
$ git push
Counting objects: 7, done.
Compressing objects: 100% (4/4), done.
Writing objects: 100% (4/4), 376 bytes, done.
Total 4 (delta 3), reused 0 (delta 0)
error: unable to create temporary sha1 filename ./objects/tmp_obj_gBZ5Rl:
Permission denied

fatal: failed to write object
Inspection revealed that git objects were being written to .git/objects with the group write permissions bit off.
The solution turned out to be fairly straightforward. In the file .git/config, I added a line that read: "sharedRepository = group", like so:
[core]
        repositoryformatversion = 0
        filemode = true
        bare = false
        logallrefupdates = true
        sharedRepository = group
Thereafter, new files in .git/objects were created with the proper permissions for group write. (However, note that new files are group-owned by the primary group of the user account via which the push was received. If the users collaborating on the project have different primary groups, and if those users do not share membership in that set of groups, you may still run into problems.)
Disclaimer: I'm far from being a git expert. Though this solution worked for me, you're advised to do additional research on your own. For example, while writing this post, I stumbled upon this article that has extra, useful looking information you should read: Converting a Shared Subversion Repository to Git (The section titled "Make the shared Git repository" in particular.)
Happy collaborating!
...posted at: 11:11 | path: /git | permanent link to this entry
Wed, 16 Jul 2008
The problem -- You have an HTML form whose action points produces a GET URL like this: http://example.com/foo.php?s=bar+baz but you want to redirect it to a flat directory style URL like: http://example.com/bar+baz
The solution -- Use Apache's mod_rewrite. In your .htaccess file do this:
Options +FollowSymlinks
RewriteEngine on
RewriteCond %{REQUEST_METHOD} GET
RewriteCond %{QUERY_STRING} ^s=(.*)$
RewriteRule .* /%1? [R,L]
How it works:
- RewriteCond %{REQUEST_METHOD} GET - This is a get request, so make that a condition.
- RewriteCond %{QUERY_STRING} ^s=(.*)$ - This condition says: "The query parameters begins with s and the value of s will be captured for later use."
- RewriteRule .* /%1? [R,L] -- This rule says: "Redirect, replacing everything with a / followed by the value captured in the QUERY_STRING condition above, and if this rule succeeds, don't process any more rules.
Hope that helps someone out there. The important thing to remember here is that you have to match the name-value pair in the QUERY-STRING condition, not in the RewriteRule. If you notice anything incorrect about this solution and want to comment, send me an email and I'll post your comment as an addendum.
posted at: 11:11 | path: /apache | permanent link to this entry
Fri, 16 May 2008
posted at: 11:11 | path: /misc | permanent link to this entry
Lately, I've been using Ubuntu about fifty percent of the time throughout my workday. I used to use Linux 100% of the time (Slackware or Debian), but for the last few years I've been using Mac OS X 100% of the time. Making the switch from Linux to Mac OS X was largely snag-free, but I did have to spend a fair amount of time finding applications in Mac OS X that performed all the functionality I was used to in Linux. Now, that I'm using Linux again, at least half-time, I find I'm having to go through the same exercise of finding apps and utilities that do what I need. Mostly, this has been very easy.
One exception has been annoying because it's something that's so trivial, one would assume it'd be easy to take care of right off the bat. Namely, I need a simple "tea timer" utility. You know... you tell it how many minutes to count, and when that many minutes has passed, it makes an obnoxious sound.
I've looked around a few times now for such a beastie. There are a couple of things that are pretty close, but nothing that exactly fits the (simple) bill. Today, annoyed by the absence of a tea timer again (I use timers all the time for various reasons -- the major one right now being that I have to enforce typing breaks because I have a slipped disc and if I type like a fiend for hours on end, I end up in a lot of pain), I decided to just hack one out in Perl.
This was definitely a case of "Perl to the rescue." It took a couple of minutes to make a script that did exactly what I want -- much less time than I've spent scouring the 'net for a utility to do the same thing. Plus, since it uses mpg123 to play the alarm, I can use any sound I like, as long as mpg123 can play it. I ended up making a little series of chimes in Garageband for the alarm. Works great.
Here's the script. It's not the world's most elegant, but it's perfectly fine for the purpose at hand:
mbp:~$ cat bin/teatimer
#!/usr/bin/perl

$limit = $ARGV[0] * 60;
print "Starting tea timer for $ARGV[0] minutes ($limit seconds)...\n";

while ( $limit > 0 ) {
	print "seconds remaining... $limit\n";
	sleep 1;
	$limit--;
}

print "ding!\n";
exec("/path/to/mpg123 /path/to/alarm.mp3");
posted at: 11:11 | path: /linux | permanent link to this entry
Tue, 06 May 2008
posted at: 11:11 | path: /misc | permanent link to this entry
